Archive of ‘Nails’ category

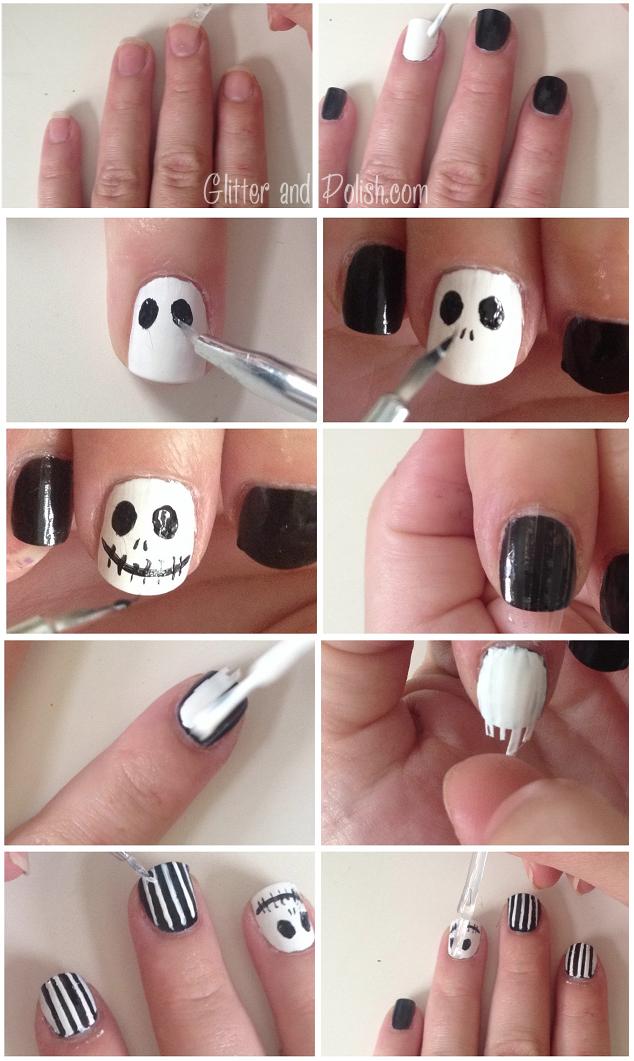
Jack Skellington Nail Tutorial

Jack Skellington Nail Tutorial

1) Prep your nail as always with a base coat and seal the edges of your nails.

2) Apply a thin coat of white polish to the ring finger and a thin coat of black to the rest. I used Sally Hansen Xtreme Wear in both cases. Once the first coat is dry, apply a second thin layer.

3) On your ring finger, use a detail brush or the rounded end of a bobby pin to create two oblong circles toward the base of your nail. They should flare out slightly toward the edges of your nails. Start with a small oval and gradually build it into larger ovals.

4) With the tip of a detail brush or a tooth pick, create two short vertical slits for the nostrils.

5) With the same detail brush, drag a circular line across the tip of your nail for the smile. If you mess up, you can always go back in with the white and clean up some of the mistakes. Add short vertical lines through the smile.

6-8) For these steps, I took pictures of two different ways to do the stripes depending on what you think you’ll be best at. You can either cut thin strips of tape and place on your nail (the polish has to be completely dry for this to work). Then you can paint white over the whole nail and gently remove the tape. This will give you clean lines and you don’t have to have a steady hand.

9) You can also use the detail brush again to create the lines like I’ve shown on my middle finger in this step. You can always go back in and clean up edges using the black polish.

10) Finish with a top coat!

Spider Web Nails

Spider Web Nails
Spider Web Nail Tutorial

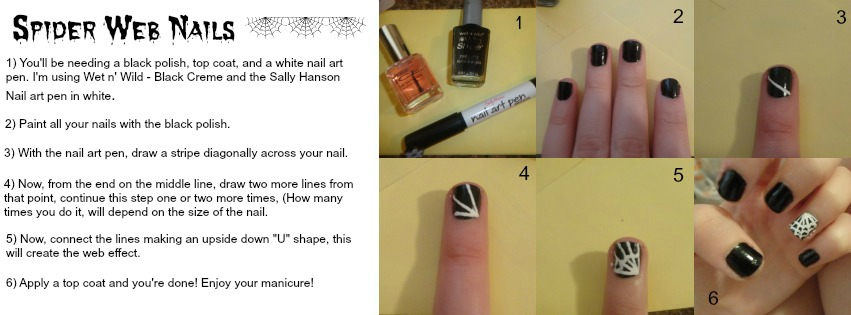
Step 1. You’ll be needing a black polish, top coat, and a white nail art pen. I’m using Wet n’ Wild – Black Creme and the Sally Hansen Nail art pen in white.

Step 2. Paint all your nails with the black polish.

Step 3. With the nail art pen, draw a stripe diagonally across your nail.

Step 4. Now, from the end on the middle line, draw two more lines from that point, continue this step one or two more times. (How many times you do it will depend on the size of your nail.}

Step 5. Connect the lines making an upside down “U” shape, this will create the web effect.

Step 6. Apply a top coat and you’re done! Enjoy!

Dotticure Tutorial

dotticure
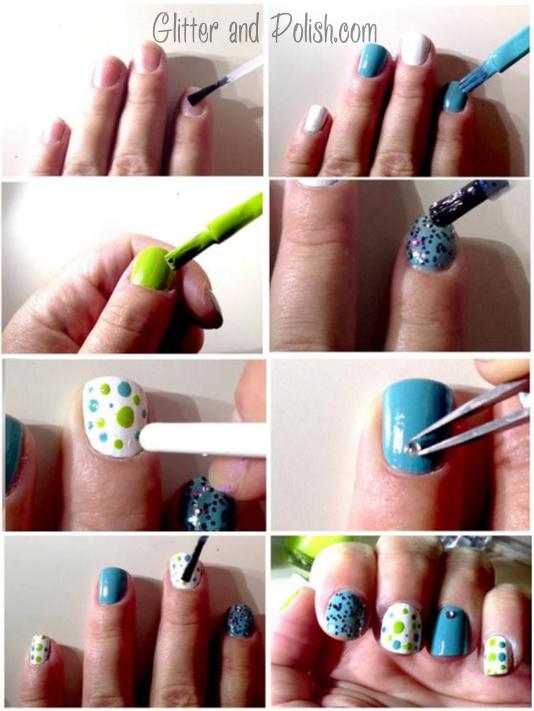
1. Start with a top coat and remember to seal the edge of the nail to prolong the manicure.

2. Add an opaque white polish to the pinkie and middle finger nails.Add an aqua-blue nail polish to the ring finger and the pointer finger. Once the first layer of polish is dry, add a second coat.

3. Add a lime green polish to the thumbnail.

4. Now, add a blue glitter polish to the pointer finger nail. You may need two coats.

5. With either the rounded edge of a nail or makeup brush or the end of a bobby pin, create small dots on the middle finger nail and the pinkie nail. In small circular motions, slowly create a larger dot from a few of the smaller ones.

6. Add an accent gem stone to the base of the thumb and ring finger with tweezers. You can use one with a sticky gem, with nail glue or by placing it on top of a still-wet top coat.

7. Finish with a top coat!

Jack-O-Lantern Nail Tutorial

pumpkinnailtutorial
Halloween is not until next month, and although it’s a bit early, I just can’t wait and want to share this with you now!

In this tutorial I’ll show you how to make these super cute jack-o-lantern nails with dotted tips.

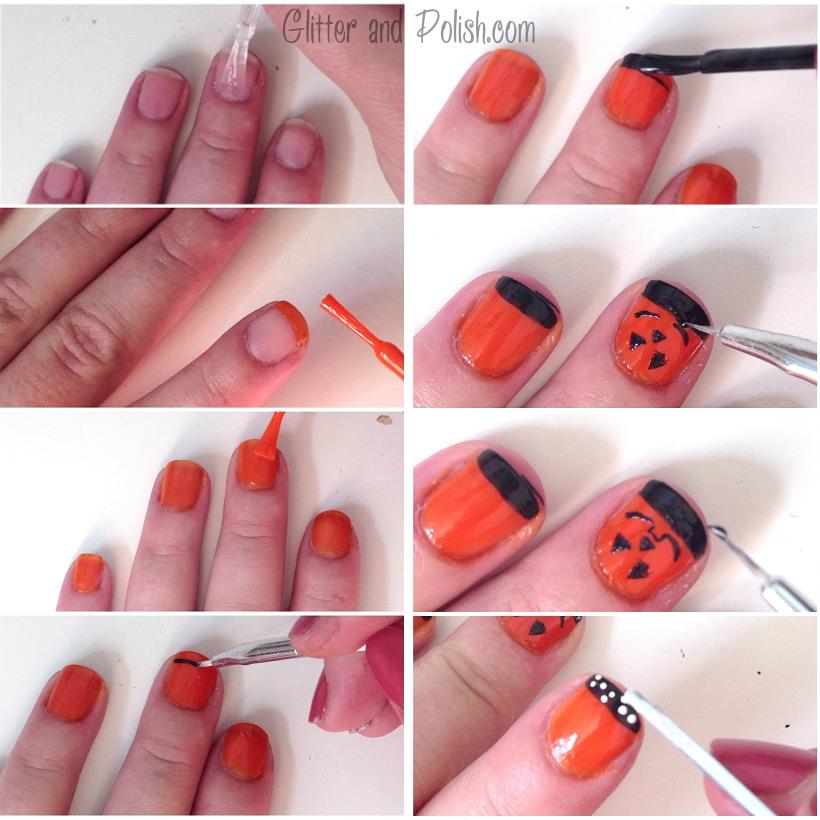
1) Start with a base coat and make sure to seal the edges of your nails to make the manicure last.

2) Seal the edge of your nail again with the orange polish. I used Wet N’ Wild’s “Cursed.”

3) Coat nails with a thin coat of polish. Apply second coat after first coat dries.

4) With a thin detail brush, apply a thin stripe of black polish. If you don’t have a thin brush, use a piece of tape against your nail so that you can use the normal black polish brush to create the french tip.
5) Fill in the french tip with the black polish.

6) With the detail brush, draw on the outline of 2 triangles close to the base of your nail. Draw a third one below and between the two. It will be easier if the polish is thin. Underneath the nose, draw two semi-circles.

7) Between the two semi-circles, draw two vertical lines and then connect them with a horizontal line on top. This will finish the mouth.

8) I used the end of a bobby pin to create the white polka-dots. The rounded edge of the pin works well for small dots. Finish with a top coat once everything else is dry.

Enjoy!

Chevron Glitter Accent Tutorial

Chevron Glitter Accent
In this tutorial I will show you how to do a simple chevron nail design with a glitter accent that is so cute and fun to show off.

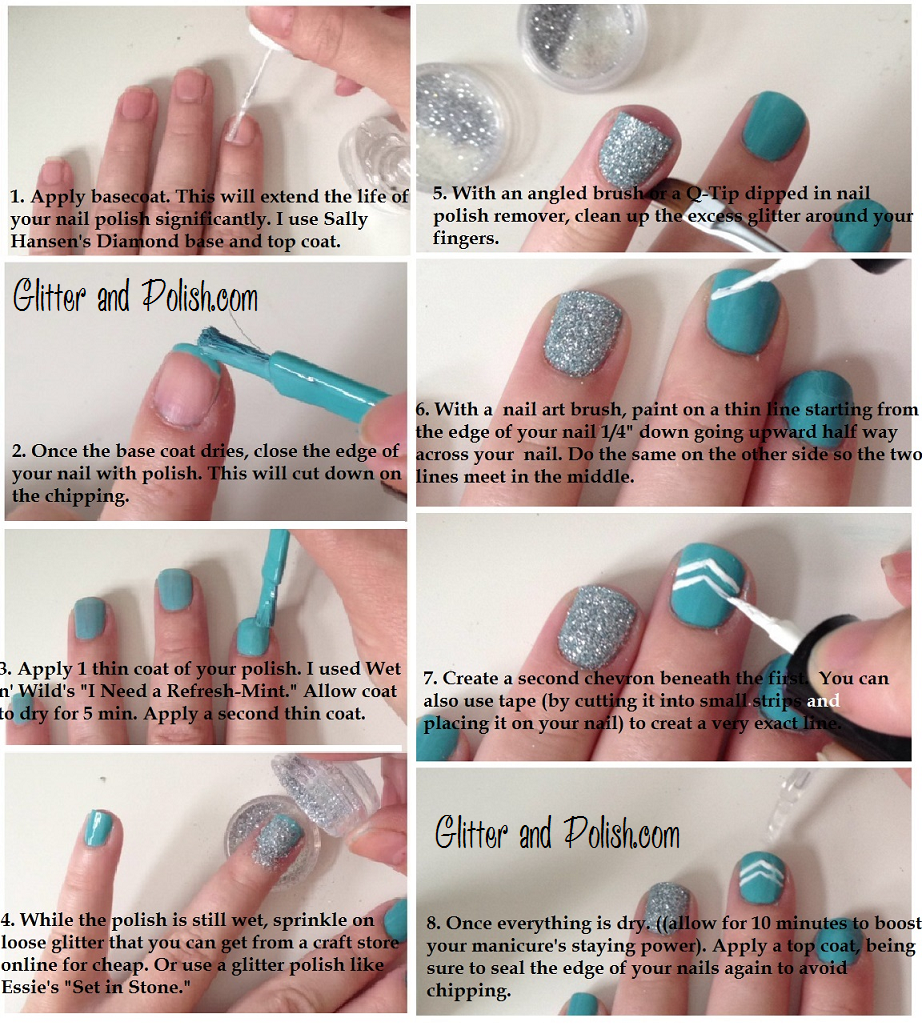
Step 1. Apply basecoat. This will extend the life of your nail polish significantly. I used Sally Hansen’s “Diamond” base and top coat.

Step. 2. Once the base coat dries, close the edge of your nail with polish. This will cut down on the chipping.

Step. 3. Apply one thin coat of your polish. I used “Wet N’ Wild’s “I Need a Refresh Mint” Allow coat to dry for 5 min. Apply a second thin coat.

Step. 4. While the polish is still wet, sprinkle on loose glitter that you can get from a craft store online for cheap. Or use a glitter polish like Essie’s “Set in Stone”.

Step 5. With an angled brush or a cotton swab dipped in polish remover, clean up the excess glitter around your fingers.

Step 6. With a nail art brush, paint a thin line starting away from the edge of your nail 1/4″ down going upward half way across your nail. Do the same on the other side so the two lines meet in the middle.

Step 7. Create a second chevron beneath the first. You can also use tape (by cutting into small strips and placing it on your nail) to create a very exact line.